Saturday, August 13, 2022

Reviewing the basics with YouTube Tutorials

As the last moments of summer vacation tick away, I've been devoting more of my head space to redesigning my Intermediate and Advanced Art classes. The structure of my Beginning Art class is a strong foundation that I will continue to tweak and build on. If you use Canvas as your LMS, you can find that course in Canvas Commons. For more information, I wrote about it in this blog post.

Last year, I tried giving my upper level art students more autonomy while directing them individually and in small groups throughout their Sustained Investigation. A colleague suggested that I read "The Open Art Room" because it sounded like I was moving in that direction. After reading the book, I have LOTS of ideas! 

I plan to organize the semester into 4 main projects. Each project will use the format outlined in the book: Inspiration, Design/Development, Creation and Reflection. For their first project, Intermediate art students will use black and white media, and I've spent the last couple of days making tutorial videos for them. 

This first video (basics of graphite) will be a quick review of graphite; hopefully, they remember most of this from beginning art.


In this 2nd video, they'll review blind-contour and contour drawing. I'll have them create several drawings of cans, leaves and other materials.


Next, they'll make some observational sketches. Before they begin, I'll use this video to help explain what I'm thinking about when I draw, and how I make decisions.


Free Beginning Art Course in Canvas Commons!

I just uploaded my Beginning Art (Art 1) course for Visual Arts to Canvas Commons! If you use Canvas as your LMS, this should be easy for you to download and import into your own course. 

Here is the link if you're interested: Beginning Art

About the course

Unit 1: Elements of Art / Principles of Design

This is an overview of the elements and principles. There are google slides that prompt students to take notes and create some basic examples in their sketchbooks. They analyze how the elements / principles are used in an artwork and there's a quiz at the end of the unit.

Unit 2: Classifying and Critiquing Art

This unit covers the classification of representational, abstract and non-objective artwork. Students also learn about different genres: still life, landscape, history paintings, portraits, etc. The four steps of critiquing an artwork (describe, analyze, interpret and evaluate) are deconstructed, and students have a chance to practice using them. 

Unit 3: Element of Art: Space Practice

Students will learn about how artists use space in their work. Overlapping, aerial perspective, linear perspective, high/low placement, and size are all techniques that artists use to create the illusion of space. Students will learn to recognize these and exemplify them. There are tutorials in creating drawings of interior and exterior spaces using one and two point perspective and a tutorial on applying aerial perspective when using graphite and watercolor. At the end of the unit, students critique an artwork that uses many of the techniques they learned about. 

Unit 3: Element of Art: Space Project

Students have the choice between two projects. Both projects require students to use the techniques they've been practicing to create an artwork that gives the illusion of a 3-dimensional space on a 2-dimensional surface.

Unit 4: Drawing Exercises

I used to teach this unit before the space unit, but many students find it easier to be successful in the space unit so I teach that one first to build their confidence. In this drawing exercises unit, students will learn a variety of exercises that artists use to strengthen their drawing skills: blind-contour drawing, contour drawing, and drawing upside down. They will learn how to draw ellipses and how to create thumbnail sketches. They'll put all of this together by drawing a still life that prompts them to arrange their own items, create thumbnail sketches and "block in" their still life during the beginning stages. 

Unit 5: Value and Shading

Students practice shading with graphite by creating several value scales using blending, hatching, cross-hatching, and stippling. Then, they practice shading a variety of geometrical forms.

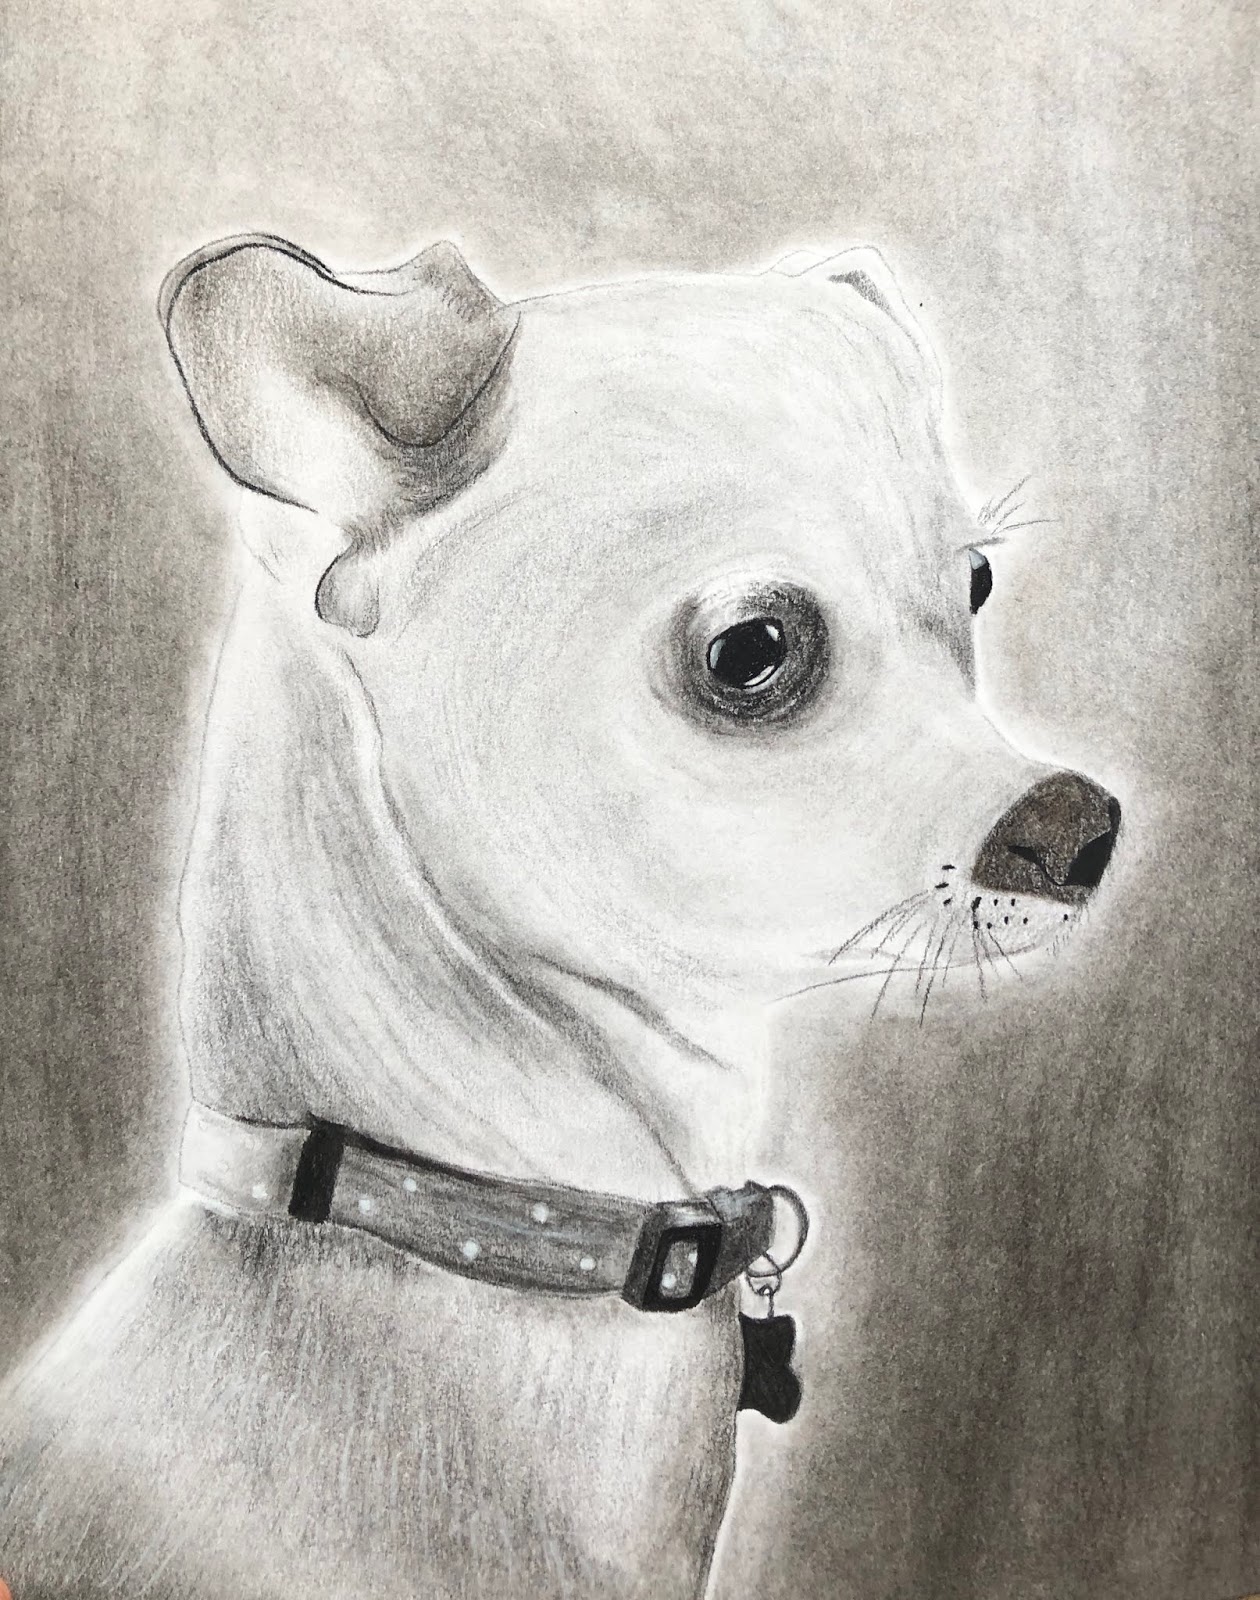
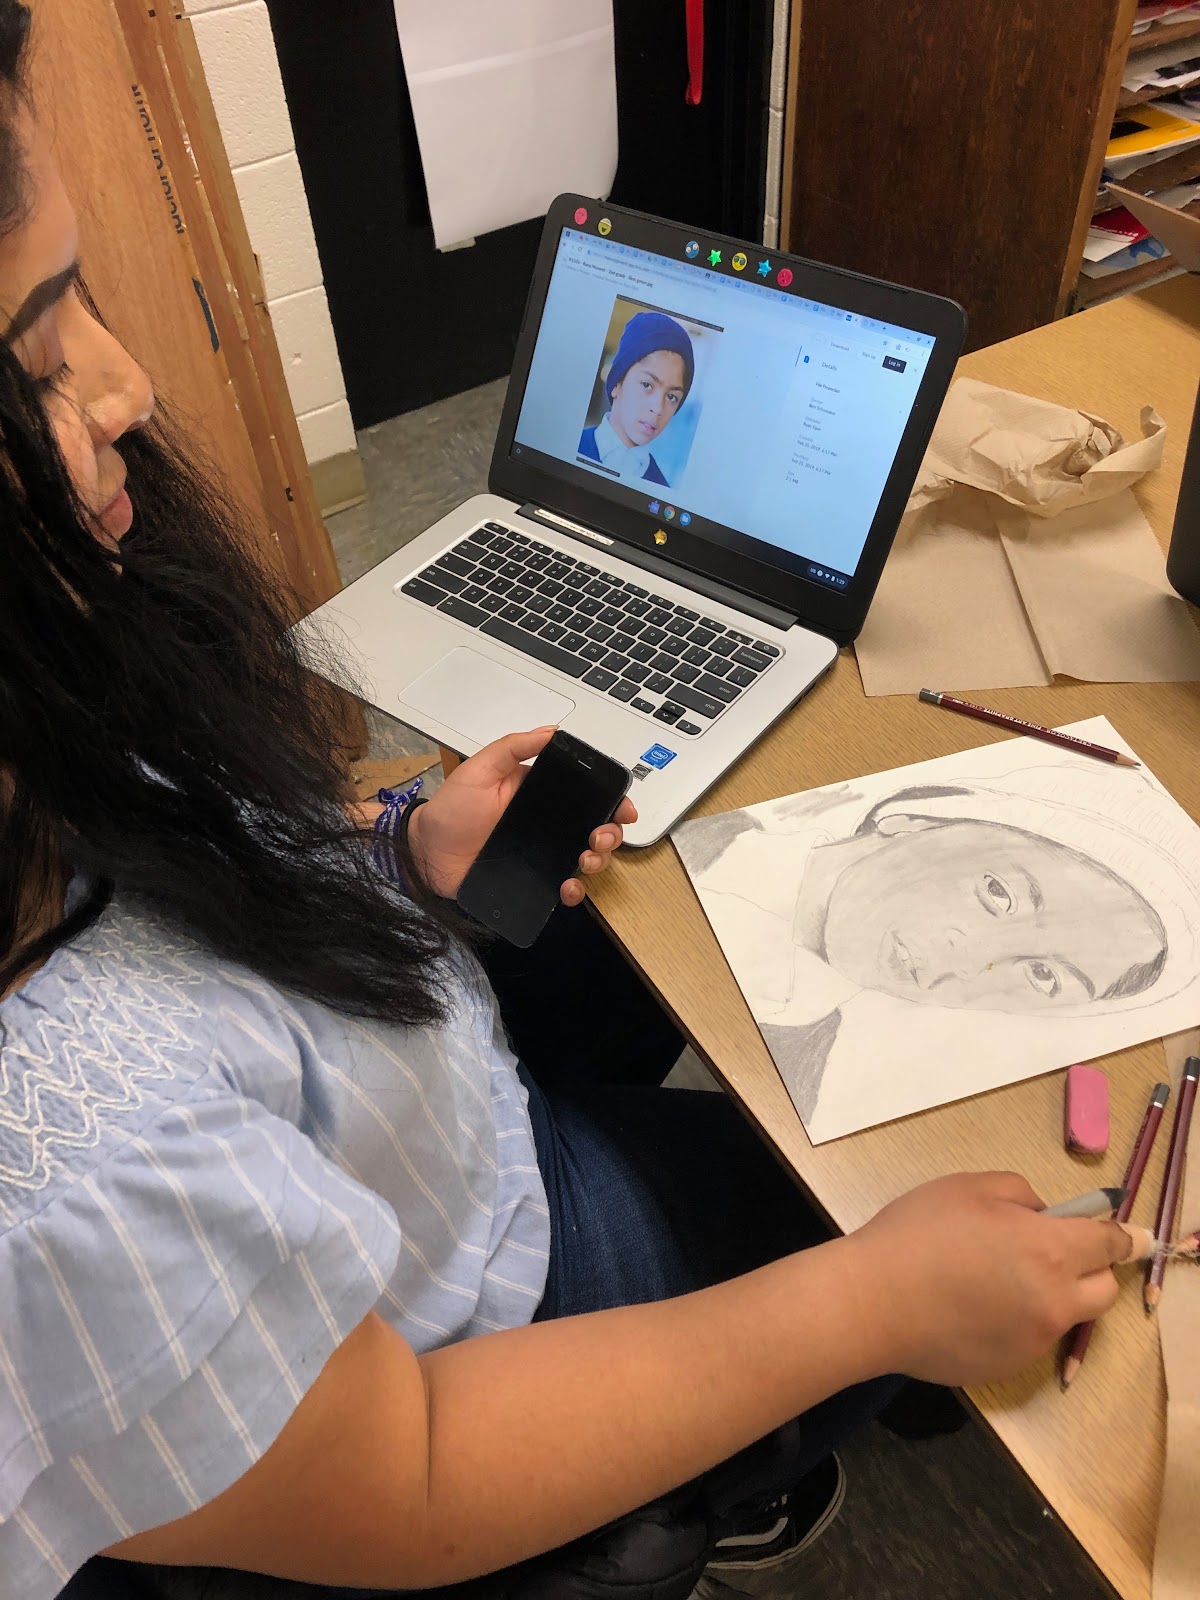
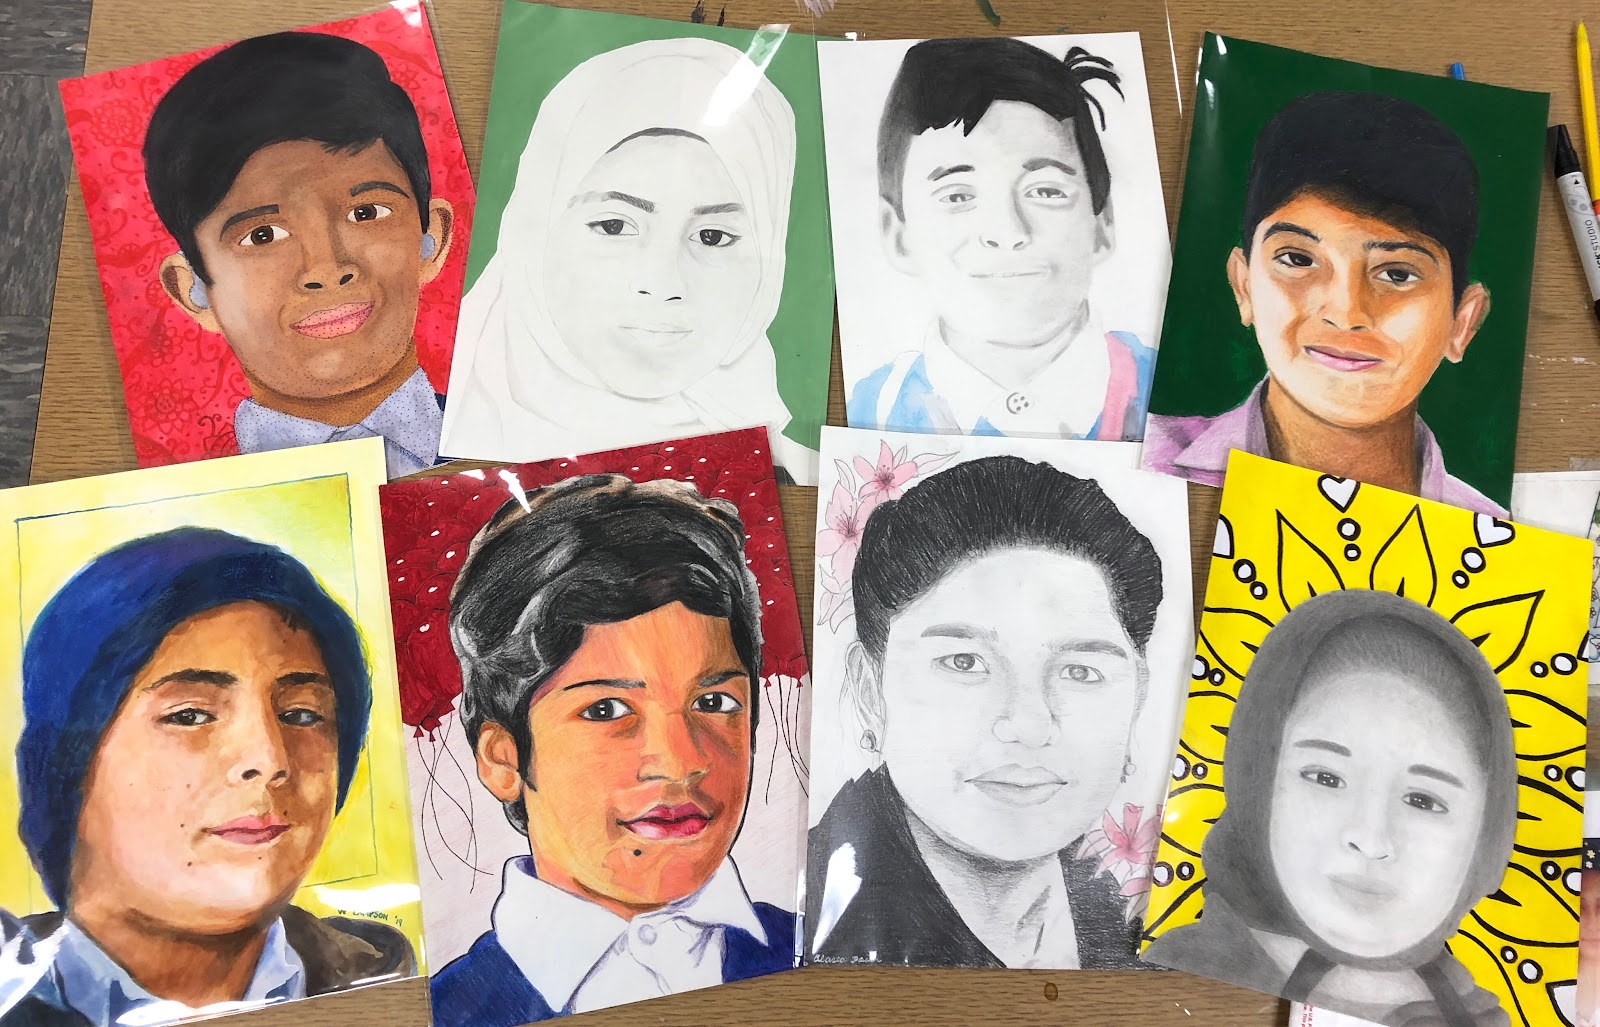
Unit 6: Portraiture and Grid Drawing

This unit breaks down how to draw each of the features of the face using correct proportions. After drawing a self-portrait from a mirror, students learn how to draw using a grid and a 2:1 ratio. The final project in this unit is a portrait applying their previously learned drawing and shading techniques. 

Unit 7: Color, Texture and Final Exam

This unit is packed! Students learn about color theory and texture through several exercises. Then, they begin working on their final exam project that requires them to apply a lot of what they have learned throughout the semester.

Each project, and most assignments, have detailed rubrics and tutorial videos so that students can complete assignments at home if they have to be absent for any length of time. A virtual teacher could choose to use this entire course while another teacher may only choose to use portions. Hopefully it's helpful to most middle / high school art educators.

One more thing - At the beginning of the course are 4 modules that are not part of the units. The first module contains the syllabus and a few activities that I use at the beginning of the year when schedules are still being changed. The 2nd module houses my classroom clean-up schedule. Students sign up to clean different things in the art room throughout the semester, and this gives them ownership and responsibility over the materials. The 3rd and 4th modules are my "bell-ringers." When students first come in the classroom, they choose one of the drawings on their table to draw from. Each week, there are about 5-10 drawings on each table. They submit a photograph of their drawings at the end of the week. 

I hope someone out there found this helpful! When I started teaching, I was so overwhelmed. I had 5 different course preps and there was NO written curriculum for my county - JUST the standards. I wish I had something like this put in place that I could tweak to make my own. If you have any questions about any of the material, feel free to email me! 

Friday, October 23, 2020

Mid Term Art Critique during Remote Learning

We are halfway through this semester of remote learning, and I wanted my students to have a chance to share the art they've been making with each other. I also wanted to host an engaging, thought-provoking critique for students to receive meaningful feedback, but every time I tried to envision doing that on Zoom, all I could picture was awkward silence and black rectangles with their names staring back at me. 

So, I created a virtual gallery in Google Slides and gave students editing rights so they could display one piece that they created during the first nine weeks. I also gave them some questions to answer: the first section of questions related to the entire exhibit, the second directed them to give feedback to three of their peers (these were assigned) and the third set of questions prompted them to reflect on their own work for the quarter.

The "Mid-Term Gallery Review" was due today and most students have completed it by this point. So far, I am very pleased with the results. The virtually gallery looks great and I have been able to collect a lot of feedback for each student. 

Everything that I used for this assignment is included below: the gallery template, the written instructions that students received and the questions they answered on a Google Doc. 

To create the virtual gallery, I borrowed this template from Adam Cross and adapted it to create this: 

(To borrow this, click here to make your own copy)

Here are the directions that I gave students: 

I.CR.1 / P.CR.1 / A.CR.1Use critical analysis to generate responses to a variety of prompts.

Objectives for this assignment:

1. You will enjoy the work of your peers by perusing a virtual gallery :)
2. You will analyze different aspects of the works by completing a gallery review.
3. You will offer valuable feedback to three of your peers (anonymously)
4. You will reflect on the work you have completed this quarter and devise a strategy for next quarter.

Instructions

1. Open this google slide. (Don't forget to give them editing rights)

2. You will be assigned a number in class. That number is located in the google slide twice: once on a gallery wall with two other artworks and once on its own slide where you will add a title, your name, the media you used and a brief description of the work. If you miss the class, or if you forget your number, please email me; I will email you back to give you your assigned number.

3. Delete your number from the two places that it appears on the Google Slide and insert a high quality photograph of the best artwork that you've created this quarter.

4. Give everyone a little time to insert their images before you complete the attached Google Doc. You may want to complete the Self-Reflection first while you are waiting for everyone to add their artwork.

5. I will assign 3 people to each of you. You will complete a peer review (in the Google document) for each of those 3 people. I will share the feedback you wrote for them, but they will not know who wrote it. I will give you the names of your 3 people in class. If you miss it, or forget who they are, please email me and I will reply with those names. 


Monday, October 12, 2020

Remote Learning: Art Class

I am currently in my ninth week of remote learning, and I have never worked so hard in my life! I also decided to complete all four components of National Board Certification this year... so that definitely factors into the workload. 

I am ALL about sharing content to help other teachers out during this time. It occurred to me that I haven't posted on my blog in a long time, and this is the perfect place to share some of the things I've been doing. 

First, let me give you some background information. My high school is fully remote right now and will be until at least January. I'm on a block schedule with four class periods- three classes and one planning period. When we are in person, those classes are 90 minutes, but the synchronous Zoom meetings are cut down to 60 minutes. We take attendance, and 70% - 80% of my students are attending, which is fairly comparable to when we are at school in person. 

I've gotten into a groove with how I run my Zoom meetings, and I would LOVE to hear your own success stories in the comments- I'm always willing to shake things up a bit and try new things. Basically, here are a few "procedures" that have been working for me. I grade student work throughout the day and try to make sure that everything has been graded before my first class meets each day. While I'm grading, any time I have specific feedback that needs to be shared with a student, I make a note in my notebook. Sometimes, I include the feedback in Speedgrader (in Canvas), but if it's something that I want to have a conversation with a student about, I make a note. 

At the beginning of each Zoom meeting, I deliver direct instruction and outline what the students will be doing for independent practice. This part of the Zoom meeting is recorded for students to view later if they missed something or were absent. 

Then, I put all of the students in individual break-out rooms. To do this, I click on break-out rooms, assign automatically, and I make more rooms than there are students... just in case some students join late. First, I visit each of the students that I made a note to give feedback to. We go over the feedback and I move on to the next student. Every time I speak to a student individually, I record their current grade on a printed spreadsheet so I can see how it goes up or down over time, and I can see how often I meet with them. After I meet with students that need individual feedback, I meet with students that I haven't met with in a day or two. Generally, I'm able to meet with each student individually every 1-3 class periods. Here's a sample of what my spreadsheet looks like. 

If I have a row with several empty spaces, that is usually due to absences, and I know to contact home or to let our admin / guidance counselors know. 

In our district, all of our middle and high school teachers are using Canvas as our learning management system. As I go along, I am sharing my modules into Canvas Commons so that other art teachers can use them. Here's an example of one of my modules and how to find it:

If you aren't using Canvas, but you are looking for tutorial videos, check out my YouTube Channel. I currently have demos on shading, linear perspective and a few other things. My tutorial on drawing boxes in one-point perspective is shown below.


If there's anything else I can share, send me an email and I'll do what I can! I would also love to hear about any tricks or tips you have about teaching remotely during this pandemic!


Sunday, November 03, 2019

Off To a Good Start

This 2019-2020 school year is my 11th year here at Graham High School, and "change" seems to be this year's theme. Three out of four of our administration team are new to Graham, and we've switched from semester block scheduling to A/B schedule. I finally feel like I'm starting to settle in to these new changes and I'm ready to post some student work.

In Intermediate, Proficient and Advanced art, I break the big chunks of our class time up by alternating a media project with 2 days of art history. We have mini assignments (sketch prompts, photography assignments, "my choice," etc) sprinkled in between, but I really like how I've finally settled into a routine with project/art history/project/art history.

After their charcoal project, Intermediate art used their first art history day to research the Renaissance movement and they wrote a critique of a work from the Renaissance on their second day. Their second project was "pen and ink," and they just finished their Baroque period research and critique.

Charcoal works by Intermediate students:


Pen and Ink Projects by Intermediate students:


Proficient Art students began with a drawing on toned paper followed by Impressionism research/critique, a colored pencil project and Post-Impressionism research/critique. 

Toned Paper Drawings by Proficient art students:


Colored Pencil projects by Proficient art students:


Advanced art students have studied Dadaism and Surrealism, and they've created a watercolor painting and a mixed media collage. Here are samples of their work:


And last, but not least, my fabulous Beginning students. In these first 23 days, they've learned about the elements of art and principles of design, how to critique an artwork by describing, analyzing, interpreting and evaluating, and they've been doing a LOT of drawing. They've practiced blind-contour drawing, contour drawing, representing ellipses from different points of view, using thumbnail sketches to plan/design their composition and they've completed a variety of shading exercises. On the second day of class, they drew a self-portrait from a mirror. We spent about 6 classes working on the proportions of the face and how to draw facial features. After that, they completed another self-portrait from a mirror, and we were able to view the "before and after" drawings side by side. Here are examples of those:


Thursday, May 30, 2019

GHS does the Memory Project

The Memory Project is a non-profit organization that matches high school art students with children who have faced “substantial challenges.”

20 Graham High School students, from a variety of art levels, were given photographs of children from an orphanage in Pakistan. They each made a portrait of a child using their choice of media.
 

The Process


First, we connected with www.memoryproject.org/. After some communication, our students were paired with kids from Pakistan and we received digital images, as well as printed copies, of each child. The students were given several weeks to complete their portrait before we mailed them back to the Memory Project organization for them to send to Pakistan.

On the back of each portrait, we attached a photograph of the student artist, and they wrote messages to "their child" in Urdu, their native language. My students really enjoyed this project, and we're looking forward to getting a video of the children receiving their portraits! 

Saturday, July 28, 2018

Hyperhidrosis: Follow up post on antihydral

When I began this blog in 2005, I mostly wrote random posts about my life and the art I was making. Now, that I'm an art teacher, the majority of my posts are focused on that, but I still receive emails with questions about a post I wrote back in 2007, so I thought I would write a follow-up.

For those of you that don't know me well, you may not know that I have hyperhidrosis. Hyperhidrosis is, basically, excessive sweating. Most of the time, it is located to specific regions of the body. I have palmar (hands), plantar (feet), and truncal. I used to have axillary (armpits), but after using Certain Dri for a year, it's gone. My sweating is generally stimulated by heat (like most people) but mostly by anxiety. Only people with hyperhidrosis have any idea how much that can affect a person's quality of life.

When it comes to my hands, I make small daily decisions as well as major life decisions based on my hyperhidrosis. Whenever I write or draw, I have a folded piece of paper under my hand so I don't get my paper soggy. When I wear material that isn't sweat absorbant, I carry a wash cloth around in my purse in case I have to shake someone's hand. As an art teacher, I carry around my own pencil when I'm giving mini demonstrations so I don't have to borrow a student's pencil and hand it back to them "wet." It is hard for me to bond with pets because as soon as I begin to pet them, my hands start sweating simply because I don't want them too- it's all a mind game.

I've made huge modifications to my life regarding my feet- I never go without socks or something on my feet. I never wear sandals. I never wear flip flops. I sleep in my socks. If I try to wear cute sandals without socks, my feet immediately start sweating because I don't want them to. Then, my hands and everything else start sweating and it lasts all day. So it's just easier to wear socks. I also wear socks and gloves when I do yoga.

I wear biker shorts or spanx underneath all my clothes. Not to suck in tummy fat... to hide sweat stains in case I get overly anxious. I don't normally need them, but wearing them takes the anxiety of worrying about it away, which is probably why I don't need them.

As far as treatments go, I have tried drysol and iontophoresis- no success with either. I have considered surgery, but am nervous about it. I have also thought about botox injections, and that still seems like a good option, especially if it can be covered by insurance.

But the most effective thing I have found is still antihydral. I can't even remember how I originally came across it, but I've been using it for 11 years, now. I still experience the sweating, and I still wear socks all of the time. But it has minimized it- enough for it to be worth using for 11 years.

When I first got it, I had to use it every night for a few weeks to notice a difference. I put it on at night and use a blow dryer to get it to dry. Then, I try to follow asleep before my hands and feet sweat too much of it off. Now, I use it about twice a week to maintain everything. There are a couple of side effects, but they are worth it to me. If my hands and feet get wet for a little while, they get SUPER wrinkly. But they go back to normal pretty quick. Also, I carry lotion around in my purse because they look dry and scaly after I wash my hands, but the lotion pretty much takes care of that.

So there's my follow-up on antihydral. If I ever find anything that works completely, I'll write another follow-up. Until then, feel free to email me or comment with questions or suggestions of your own!

Sunday, May 27, 2018

Student data tracker for a Visual Arts Class

I teach Visual Arts at a high school in North Carolina. I am the only visual art teacher in my school, so I have the unique opportunity to teach many of the same students four years in a row, and some of them achieve AMAZING levels of growth. Below is an example of a watercolor piece that one of my seniors did in her Beginning Art class and then another that she made in AP studio drawing.

Beginning Art
         
AP Studio Drawing
This example is so important for other students to see. This student worked very hard to achieve this amount of growth; she wasn't "born with it." This year, I created a student data tracker so students can keep track of what skills they are working on, and what they have mastered. I'm sure I will make multiple adjustments to it as I continue to use it, but for now- check it out and feel free to adjust it for your own classes. On the bottom of the google sheet are tabs- Beginning, Intermediate, Proficient and Advanced- these are Visual Arts courses that we have in NC. My students keep this data tracker throughout their high school career with me. Let me know if you have any questions or suggestions!


Saturday, July 01, 2017

Why do you respect teachers?

An attempt to stimulate a re-examination of why you appreciate and respect teachers....


It's not your fault- you just don't know... I didn't know- when I was in secondary school, when I was in college, even as a first year teacher- the art of teaching is grossly underestimated. I remember respecting teachers and their profession- they manage 20+ kids all day long while imparting as much knowledge to them as possible- and they try to make it fun. Yes- this sounds noble and worthy of respect and this is why most people will tell you that they support teachers... but what they don't understand is that this barely scratches the surface. 


Stop for a moment to consider the amount of money a "decent" public speaker charges. Imagine that this person speaks for about an hour and uses some form of a slide show as visual aids. 


A good teacher "speaks" to a group multiple times throughout the day - but not for too long at one time because research shows that attention spans are lower in children- not to mention, we consider that even within one age group, children have different capabilities of paying attention. A good teacher also takes into account that speaking to a group is only one way to disseminate information. Many teachers prepare by creating videos of themselves so students can watch the video at their own pace and stop and rewind if they need to. Some teachers create some form of a "hyperdoc" (http://hyperdocs.co/) to guide students through the content of the lesson- with embedded links to other websites and videos. Collecting these resources and designing them in a way that is meaningful to students is very time consuming. 


In addition to planning, designing and preparing the presentation of content, good teachers find engaging, fun and challenging ways for students to manipulate the content- writing assignments, projects, hands-on manipulatives- all of these, and many more, are carefully considered- which of these activities will enable my students to be most successful? We also like to give our students choice because the same activity won't be best for every student... and we have to consider that our students are each on different levels of understanding with each specific objective, and we attempt to scaffold our activities so our kids can work at a level that is just challenging enough without making them feel defeated before they begin. Choosing, designing and creating these manipulatives take time. 


Next, it is important that we assess our students to determine if they are able to master objectives based on the way we designed and presented the content. A good teacher spends a lot of time designing the assessment as well. Writing assessment questions is an art in itself. A true/false answer gives a student a 50% chance of guessing it right- this may not be the best way for me to determine if the student really understands the content. Questions and performance-based tasks are carefully crafted to give us the most accurate picture of what our kids understand and what they can do. 


Then, we must determine if something needs to be re-taught and why students didn't learn it the first time. This requires teachers to be humble. We have to accept that somewhere in our carefully crafted plans, there is something that we missed or something that didn't work, and we have to redesign a piece of the lesson. 


Most people are unaware of the amount of time teachers spend working behind the scene of the classroom. It is possible to work on some of this while my students are working independently and yes- sometimes I have to do that because I've fallen behind... but when I do, it robs my students of valuable individual time with me that will make the biggest impact on their success. 


I wrote all of this just to inform the average person of the unseen challenges of this profession. I know that most appreciate that I manage large classes of (in my case) high school students, that I am patient with them, that I attempt to teach them life lessons and all of that other truly important stuff, but many people aren't aware of what goes on behind the scenes. 


My job is very challenging and I love it. Designing and prepping lessons, materials and assessments requires creativity and high level thinking from me. I love the kids I teach and they motivate me to give them my best. I know most people respect teachers... I just want to add to WHY they are respected. 


And... in an effort to also address other stigmas or stereotypes ... I am an art teacher.

Wednesday, January 06, 2016

Student Critique of Her Work

Watercolor painting by Aarika, Art 3


I chose Bianca Quinn as my subject matter because her performance in Tumblr Girls by G - Eazy was inspiring. (That felt lame to type.) The trickiest part for this piece was her skin tone because it differed in undertones. Tan but yellowish undertones but she also had purpleish undertones???? Gee golly.  (Yeah.) Elements used are line, shape, form, and color. When creating this piece I was focused on accuracy, execution, color usage, and if it's visually appealing (aesthetically pleasing).

Monday, December 21, 2015


By Graciela, Art 3
For this project I had to experiment with watercolor and try different watercolor techniques. I also had to demonstrate multiple techniques in my painting. I chose to draw a face because I really like drawing people and I wanted to make it a little bit more challenging. I drew her looking down and, I chose cool colors because I wanted to create a sad feeling. I decided to paint her hair colorful to make it stand out. I wanted her hair to be the focal point of the painting. I wanted to incorporate other watercolor techniques and create a really cool background showing new techniques I learned, but one problem that I had was her hair. Her hair started to blend in with the background so that's why I chose a background that was more simple.

Sunday, December 13, 2015

Personal Critiques written by Art 2 Students


Matryoshka by Dianna, Art 2
This is an abstract painting that I recently made called ‘Matryoshka’ after the Russian Dolls. The medium is acrylic paint.

When I was making this project, I just wanted to quit and not even turn it in. I listened to various songs and looked up abstract painting techniques. I wanted a neon, crazy looking abstract vibe/feeling to it, but it really didn't come off that way. I used bright neon colors and mixed up colors too. I wanted to be like the professionals, but this is my first abstract project.Planning carefully, I didn't want a focal point anywhere in my painting. I wanted the viewer to look everywhere, and to be confused trying to figure out exactly what they’re looking at.

By Jeannette, Art 2
I created this artwork using ink pens. It features zentangle, micrography, and stippling. I feel I could’ve stippled the hair more. The lines of words by the sun and moon, I could’ve made it more straight. I forgot to shade the other sleeve, but I think it works out. I made this whole piece while thinking about opposites, everything that is good and bad. So I titled this piece, Opposing Sides. Most of my micrography has something to deal with opposites, but some of it contains parts of my pen name I created for myself.


Success  by Japreme, Art 2
 The objective of this project was to create a linear perspective drawing with accurate shading. I think I did well on most of the project. However, I think I could’ve shaded a little better. Other than the shading, I believe my project was very good. As you can see it clearly says “You’re on the road to success.” I did the project this way because it’s true. In high school we are all on a road to success by becoming successful people after high school and or after college. It’s something that I thought people should see to motivate people to get on the road to success if not already.

Abstract painting by Daequan, Art 2
In this abstract painting, I used blue, red, orange, green, purple, yellow, and black. While painting the project, I was trying to be a little creative because in most of my artwork, I never try to be creative or actually try to complete it. The reason I did some designs was because I probably liked the colors and I thought people would appreciate the creativity behind it.

I was unsuccessful because I tried too hard to make it creative and I messed up a lot of times where you could actually tell that I messed up, so I think I should’ve planned it better, or while I was doing it I should’ve thought harder about the colors I used. I was also unsuccessful because of where I painted most of the stuff. For example, I think some of the stuff I painted should’ve been in different places or smaller.

I think I will get a bad grade on this painting just because it’s bad, and I definitely could of done better, but I chose to rush because I wanted to hurry up and get it finished. 

Thursday, December 10, 2015

Student Critiques of their Work: Art 4

Artwork by Daniel, Art 4

This project was really interesting to do because it meant something to me personally when I was younger. To make this project I wanted to use different mediums to resemble the things you would normally see these objects as. I made the twitter page in the computer by making a template of how a comment would look like on a mobile device. The sky is painted using different values of blue and the poop emoji is made from colored pencil.
            From the start, we were asked to make a piece of art that would represent/have meaning on a social issue that is going on across the world. For example, global warming, bullying, and abortion are just few of many issues that we see every day on the news. The meaning behind my piece however, relates to me because I was a person affected by a bully on social media. Back when I was in middle school, I was normally picked on as a person who would be polite and caring to both my teachers and fellow peers. I was sometimes referred to as the teacher's pet because I loved helping my teachers out in any way I could. Most of the time, I would spend time focusing on assignments that were being assigned to us at the beginning of class and not worrying of others, but this all changed.
            When I first made a social media account I did not know what to expect from it, but as time went on I learned a very valuable lesson. This lesson was: friends can sometimes become your enemies and begin to have hatred for you. As the school year went on, I got picked on and when people said negative comments, I tended to get upset. This process of me being a victim of cyberbullying has made an impact in my life where I grew strong and accepted what others had said about me. People can say things to others and hurt you along the way, but if you have the right mindset and you don't care what others say, you can be a unique person. ​

            I chose to do this issue on cyber bullying because every day thousands of teens are getting bullied on a social media pages whether they are a little kid or a grown adult. Being bullied is not something that should be taken as a joke because teens have the highest rate of suicide as of right now because they are being bullied. ​I struggled to overcome this obstacle in middle school, but that did not stop me from continuing on in what I like to do best.
Queen of Hearts Critique, Josh, Art 4
“Revenge that comes from the Heart” is a mixed media piece created with watercolor and color pencil on watercolor paper. The subject matter of this is the Queen of Hearts and she is holding Alice’s head. The objective for this piece was to create an original character or create an original version of a character.

I created my own design for the Queen of hearts by changing her clothing and her hair style. Her outfit is red and black with a gold belt. The background and the edges are in different shades of brown and there red and black “Q”’s that are opposite of each other. The queen is holding up Alice’s bloody head and there are blood stains everywhere.

Tuesday, December 08, 2015

Student Critiques of Their Work: Art 3

Briana by Auset, Art 3
Before we started this project, we looked at different techniques when using watercolor. I used blossoming and salt as my techniques in the background. We didn't have a specific objective or topic , but to just use watercolor in some way. This was a portrait of my favorite youtuber, Briana Hall a.k.a. SmartistaBeauty. Something i would've done differently was used another medium such as pen or graphite to draw her then just paint in the areas. Something i liked about watercolor was that you can do different things with it to accomplish any look. Even though it's not my first time using watercolor, i wasn't aware of the different techniques. It's versatile and gives you many options.


A Jolly Day Before Halloween by Julie, Art 3
This work was inspired by The Nightmare Before Christmas, and the idea came to me from a fellow classmate. Since it was my favorite movie and very close to Halloween, I decided to roll with that idea. I used Acrylics on Santa and Jack and water colors for the background. The background is meant to represent Christmas and Halloween. I think that this was also successful in the sense that it came out pretty nice. I tried to balance the background a bit with the main part, Santa and Jack. I think it kind of worked.

Sunday, December 06, 2015

Student Critiques of their Work: Art 2


Diamond  by Angel, Art 2
Hey my name is Angel, and this piece of artwork is of my dog and her name is Diamond. I created this piece of artwork with color pencil for a project for my art class. Overall, I liked how the dog turned out and how you can see the variation of color and value in her coat. I used blue, brown, and black color pencils to create the color of the dog. I personally feel that I could have made the background better by making the shades of brown similar. I don’t like how my background turned out because you can notice the different shades of brown that there are. If I had the chance to do this project again, I would test the colors on a separate sheet of paper to see if that’s the color I needed. Just to let the person know who is reading this that this was my first project using only color pencil. Feel free to give me feedback. :) 

Automatic Painting by Destiny, Art 2
 My Abstract Painting is made with pastel colors. I started with 3 sections using pink, blue and gray in one, turquoise and yellow with white in one, and all those colors in the middle. I then started to mix all the colors together to make a smooth surface of blended colors. After looking at it for a while, I decided to make it thick with texture so I put thick blobs of paint on and let it dry. Then, I put more thick blobs and spread it in little lines. Afterward, I used all the colors all over the canvas to make it look more unified.  


Automatic Painting by Seham, Art 2

I created my abstract art with paint. Also, in the beginning, I wasn’t sure what to do, even though with automatic painting you are not supposed to think about what you are doing, you just do it. I tried to use many colors that went together. One of the things I felt less successful on was that I used too much of the repetition of the same pattern, which I tried to change towards the end. Also, to make it look better, I drew lines to keep the project neat and to add some visual interest creating a variety of brushstrokes. In the beginning, I did not think I did that good of a job, but in the end it looked really good to me. In the corner I tried to draw something everyone knows, which is an emoji. I did not think I did well on that because you can see the texture of the white paint behind it, and I tried to fix it, but I could not. To make it look prettier to me, I added paint splatters and also I found a hard brush and made different patterns with them. Overall I think I did a very good job.

One Point Perspective Project by Cindy, Art 2
I made this  drawing with charcoal and graphite, and it was created on September 4th, 2015 at GHS. This linear perspective project depicts the Graham High School fine arts building. It was taken from a distance to show a one point perspective view of the hallway.

The focal point of the drawing is the middle of the double doors. Everything in the drawing goes to the double doors, like the curtains, walls, and lights. The shading/blending technique was used throughout the whole drawing. There are darker values in different areas of the drawing, like in the curtains. The curtains have a darker value while the ceiling is a little bit lighter. The element of line is also present in the drawing. All of the walls and the ceiling have lines coming from them and they all meet at the focal point.

I think the drawing is successful. It is successful because it appears to be neat and the blending is good. The drawing is neat enough to see that it is a hallway. Overall I think it is a great drawing of the GHS fine arts building because I was able to draw it and all the walls and objects go to the focal point.

Thursday, May 29, 2014

Graham High School's Annual Art Exhibit 2014

Graham High School (in Graham, NC) recently held its Annual Art Exhibit showcasing at least one work of art by each of the students that took art this year. The kids worked really hard and created some great pieces! 

We are currently raising money to buy some exciting things to enhance our program next year. If you are interested in donating, find out more by clicking on this link: http://www.gofundme.com/9ne1sc

More artwork from the exhibit can be seen below.


Work by Art 2 students
Work by Art 1 students


Self-Portrait by Graciela Sebastian, Art 1
Self-portrait by Julie Jackson, Art 1
Sculptures by Arely Castillo, Art 4
Daisuki Candelario, Art 3
 
MacKenzie Heckmann, Art 2
 
Graciela Sebastian, Art 1
Arely Castillo, Art 4


Daisuki Candelario, Art 3